
At its core, API integration is about making two separate pieces of software talk to each other automatically. Think of it as building a bridge between applications so they can share data without anyone having to lift a finger. This connection gets rid of manual work and, frankly, makes everything run a whole lot smoother. You’ll typically get an API key, write a bit of code to send requests to a specific endpoint, and then handle the data that flows back.
Table of Contents
Why API Integration Is Essential for Modern HR

Before you write a single line of code, it’s worth taking a step back to see the bigger picture. Learning how to integrate an API isn’t just a technical task; it’s a strategic decision that can genuinely transform your HR operations. When you connect your main HRIS (Human Resource Information System) or ATS (Applicant Tracking System) with a specialised service like SpringVerify, you start seeing real, measurable benefits almost immediately.
Let’s walk through a common HR scenario. A hiring manager finally moves their top candidate to the ‘Offer Accepted’ stage in the ATS. Great news! But without an integration, this is where the manual grind begins. Someone on the HR team has to copy-paste the candidate’s details, log into a separate background check portal, and kick off the screening process. It’s slow, tedious, and a perfect recipe for data entry errors.
Automating Key HR Workflows
Now, imagine that same scenario with a solid API integration in place. The moment that candidate’s status is updated, the ATS automatically pings the SpringVerify API with all the necessary information, and the background check starts instantly. No delays, no manual work.
This one simple automation unlocks several powerful benefits:
- Drastic Reduction in Turnaround Time: Checks kick off the second you need them to, which really speeds up the entire hiring timeline.
- Elimination of Manual Data Entry: Automation takes human error out of the equation, ensuring the data you’re using is always accurate.
- Enhanced Candidate Experience: A fast, seamless process always leaves a great first impression on your new hires.
This shift frees up your HR team from getting bogged down in repetitive admin tasks. Instead of chasing down details and double-checking forms, they can pour their energy into high-impact work that actually moves the needle—like building out talent strategies, boosting employee engagement, and nurturing your company culture.
By connecting different systems, you create a cohesive and intelligent HR ecosystem. This allows data to flow seamlessly between platforms, providing a single source of truth and enabling more informed decision-making across the entire employee lifecycle.
To truly understand and shape your workforce, API integration can connect your core HR systems with specialised platforms, such as those used for organizational culture assessment tools. Ultimately, knowing how to integrate an API is about building a more efficient, accurate, and strategic HR function. For a deeper look into how this works, you can explore the specifics of the SpringVerify API integrations to see real-world applications in action.
Laying the Groundwork for a Smooth Integration
A successful API integration is all about solid preparation. Think of it as laying a strong foundation before you build the house; getting these details right from the start will save you countless headaches once you actually start coding. The first step isn’t writing a single line of code—it’s gathering what you need and understanding the landscape you’re working in.
This prep work is more critical than ever. The API economy is booming, and the India API management market, valued at USD 238.3 million in 2024, is a perfect example. Projections show it soaring to USD 1,805.8 million by 2033, a huge leap driven by mobile app adoption and the need for different software systems to talk to each other seamlessly across Indian companies.
Your Pre-Integration Checklist
Before you dive into the code, you need to get a few key things in order. This isn’t just busywork; it’s about organising your project and getting crystal clear on what you want to achieve.
- Secure Admin Access: First things first, make sure you have administrative privileges for your HRIS or ATS. You’ll need this level of access to configure the integration settings and possibly install a connector or plugin.
- Pinpoint Your Key Workflows: What exactly are you trying to automate? Get specific. For example, is your main goal to automatically trigger a background check the moment a candidate’s status is changed to “Offer Extended”?
- Map Out the Endpoints You’ll Need: Based on that workflow, list the specific SpringVerify API endpoints you’ll be calling. The most common ones involve creating a new candidate, initiating a check, and pulling the latest status of an ongoing verification.
- Confirm the Authentication Method: Double-check how you’ll authenticate your requests. With the SpringVerify API, this is typically done by sending a unique API key in the request header.
As you prepare, it’s smart to understand what your target systems can do. For instance, reviewing hireflyapp’s features gives you a concrete idea of what’s possible on that platform. For a wider perspective on optimising these processes, our guides on modern human resources practices can offer some valuable context.
Sandbox vs. Production: Know Your Environments
One of the most crucial steps in your prep work is understanding the difference between the sandbox and production environments. Any professional-grade API, including SpringVerify’s, will provide these two separate spaces for a very good reason.
The sandbox environment is your private playground. It’s a completely isolated testing area that behaves just like the live API but uses zero real data. This is where you can experiment freely, make mistakes, and perfect your integration logic without any risk of bothering actual candidates or racking up charges.
Starting in the sandbox is non-negotiable. It lets you validate every single part of your integration—from authentication and data mapping to error handling—in a completely safe and controlled setting before it ever touches live information.
Once you’ve tested your integration inside and out and are confident it’s working perfectly, you’re ready to move to the production environment. This is the live system where real background checks are initiated and real data is processed. Making the switch is usually as simple as swapping out your sandbox API keys and endpoint URLs for the production versions. This careful, two-stage approach is the secret to a stable and reliable launch.
Right, you’ve got your system prepped and your credentials ready to go. Now it’s time to put theory into practice and actually send your first request to the SpringVerify API. This is the moment your integration plan becomes a real piece of working automation. Reading documentation is one thing, but writing the code that brings it to life is where the magic happens.
We’ll walk through a real-world example of initiating a new background check. This boils down to two key parts working together: setting up the correct request headers for authentication and structuring the request body with all the candidate’s information.
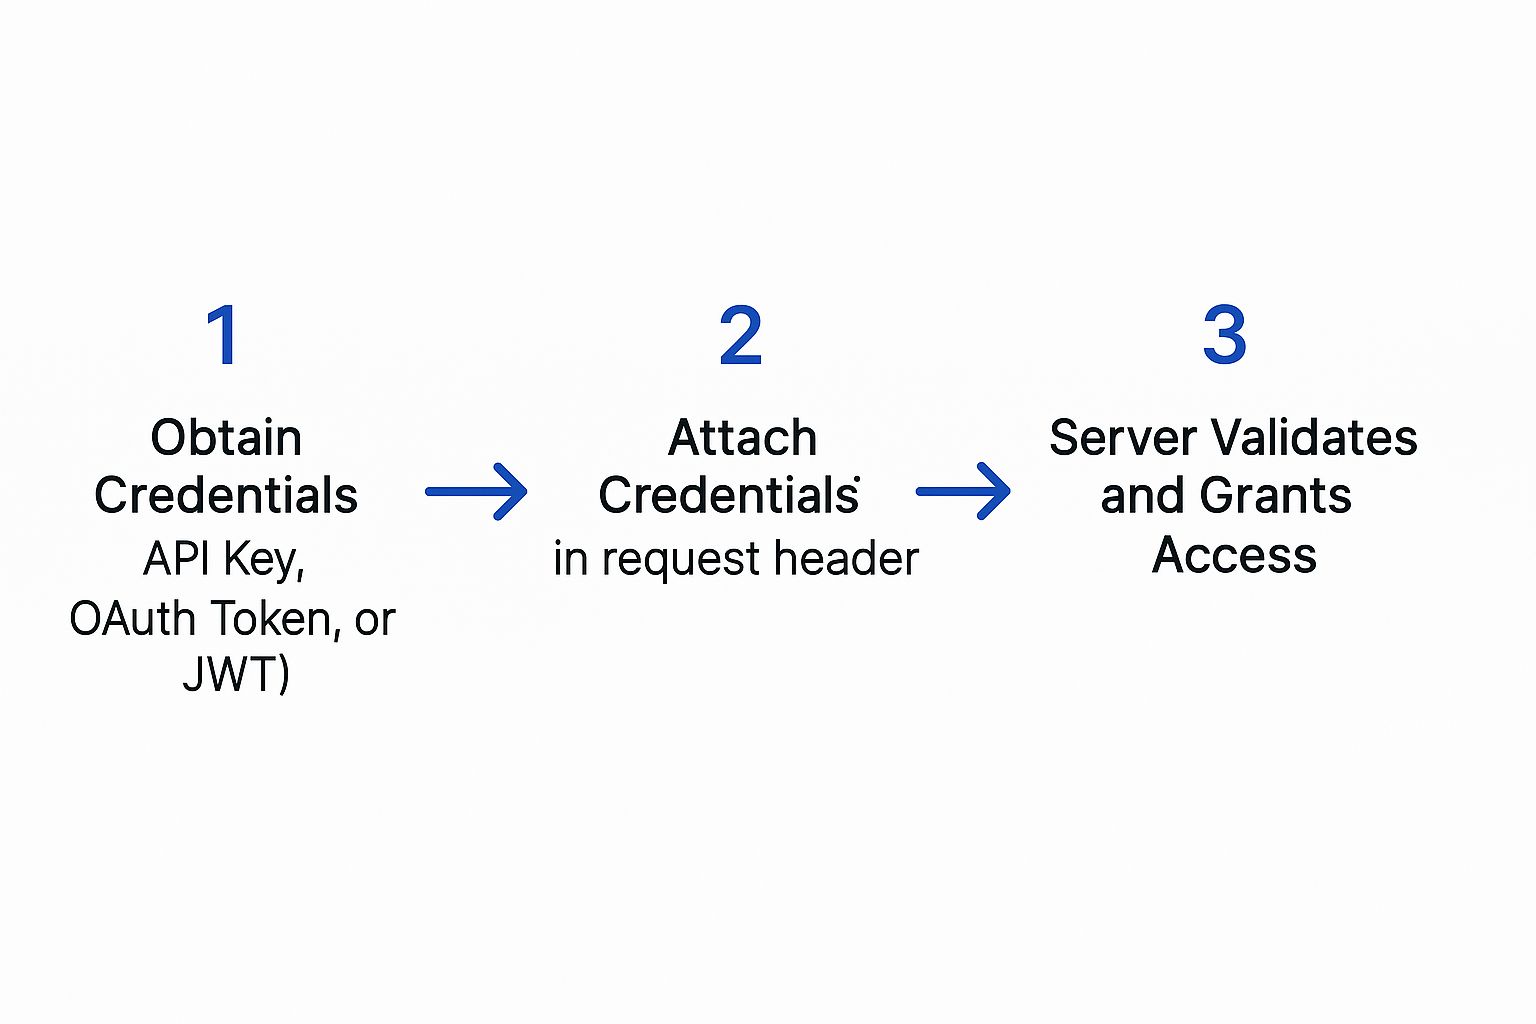
Think of it like a secure handshake. Your system presents its credentials, the server validates them, and only then does it allow the request to proceed. This ensures only authorised applications can interact with the data.
This infographic gives a great visual of that basic authentication flow.
Structuring the API Request
To kick off a background check, you’ll be sending a POST request to a specific SpringVerify endpoint. We use a POST request because you’re creating a new resource—in this case, a new candidate and their associated check.
Let’s break down the two main parts of this request. I’ll use Python for the examples since it’s incredibly popular for its simplicity in handling API calls.
First, you need to configure the request headers. The header is where you stick your authentication credentials. For the SpringVerify API, this means including your unique API key. It’s what tells our server who you are and confirms you have permission to make the request.
Next up is the request body, which you’ll often see called the payload. This is a JSON object that holds all the details of the candidate you want to verify. Getting this structure exactly right is critical, as the API is expecting very specific fields.
I always tell my team to think of the header as the envelope with your return address (your API key), and the payload as the letter inside containing all the necessary information (the candidate’s details). Both have to be perfect for the message to be delivered and understood.
Crafting the Code to Send the Request
Here’s a hands-on Python example using the request library, which is pretty much the standard for this kind of work. This little snippet shows you exactly how to build the headers and payload to create a new check.
import requests
import json
Your unique API key from the SpringVerify dashboard
api_key = “YOUR_SECRET_API_KEY”
The endpoint for creating a new check
url = “https://api.springverify.com/v2/checks”
The header containing your authentication key
headers = {
“X-API-KEY”: api_key,
“Content-Type”: “application/json”
}
The payload with the candidate’s details
payload = {
“candidate”: {
“name”: “Riya Sharma”,
“email”: “[email protected]“,
“phone_number”: “919876543210”
},
“checks_to_initiate”: [
“ID_VERIFICATION”,
“EMPLOYMENT_HISTORY”
]
}
Send the POST request to the API
response = requests.post(url, headers=headers, data=json.dumps(payload))
Print the response from the server
print(response.status_code)
print(response.json())
In this code, we’ve clearly defined the API key, the target URL, the headers, and the payload. The requests.post() function bundles it all up and shoots it over to the SpringVerify server.
Understanding the API Response
Once you send the request, the API will immediately send back a response. The first thing you should always look at is the status code.
A successful request to create a new check will return a 201 Created status code. This is the server’s way of saying, “Got it, validated it, and created the new check successfully.” A 200 OK is also good, but 201 is more precise for resource creation.
The response body will also contain a chunk of JSON with some vital information. Most importantly, it will include a unique check_id for the verification you just started. You must grab this ID and store it somewhere safe. It’s the handle you’ll use in future API calls to track the status of this specific background check.
For instance, a successful response might look something like this:
{
“status”: “success”,
“data”: {
“check_id”: “chk_a1b2c3d4e5f6g7h8”,
“candidate_id”: “cand_z9y8x7w6v5u4t3s2”,
“message”: “Check initiated successfully.”
}
}
Capturing that check_id is the final, crucial step in making your first successful API call. With that ID in hand, you’ve officially bridged your HR system with SpringVerify and paved the way for a fully automated workflow.
Implementing Secure Authentication and API Key Management
When you’re figuring out how to integrate an API, especially one that handles sensitive candidate information, security can’t be an afterthought. A breach isn’t just a technical glitch; it’s a massive blow to your company’s reputation and your candidates’ trust. That’s why robust authentication and key management are the bedrock of any solid integration.
Think of your API key as the master key to your entire verification system. It grants the power to initiate checks and pull personal data, so protecting it has to be your number one priority. Treating it with the same vigilance you would a password isn’t just a good idea—it’s absolutely essential.
Securing Your API Keys The Right Way
One of the biggest blunders I see developers make is hard-coding API keys directly into their application’s source code. This is a huge risk. If your code ever gets exposed—whether through a public repository or a simple security slip-up—your key is out there for anyone to grab and misuse.
The industry-standard, and frankly the only way you should do it, is to use environment variables.
An environment variable is a value stored outside your application’s code, sitting directly on the server where your app runs. Your code then simply reads the key from this secure spot whenever it’s needed. This keeps your credentials completely separate from your codebase.
- Why It Matters: This approach ensures that even if your source code is compromised, your API keys stay safe.
- How to Do It: Pretty much every modern programming language and hosting platform has a straightforward method for setting and accessing these variables.
Think of your API key like the key to your house. You wouldn’t leave it taped to the front door for everyone to see. Storing it as an environment variable is like keeping it in a secure lockbox that only your application knows how to open.
The SpringVerify Authentication Process
With the SpringVerify API, authentication is handled through a custom header in your API requests. For every single call you make, you must include your secret API key in the X-API-KEY header. It’s how our server verifies your identity before it processes any request.
If that key is missing or wrong, the server will immediately reject the request with a 401 Unauthorized error. This instant feedback loop is your first line of defence, confirming whether your authentication setup is working as expected.
This security-first approach is critical. Just look at India’s financial sector, where APIs are the backbone of digital payments. The Unified Payments Interface (UPI), a heavily API-driven system, processed transactions worth roughly $3 trillion in 2023 alone. This staggering volume shows why API security is non-negotiable. In fact, in 2023, 73% of financial institutions ranked API security as their top technological concern, a significant jump from 65% in 2022, underscoring the growing demand for secure integrations. You can read more about these API security trends in financial services.
A Quick Security Checklist
To help you get this right, here’s a quick-reference checklist. It covers the essential security practices to ensure your API integration is robust and protects sensitive data at every turn.
API Security Best Practices Checklist
| Security Practice | Why It’s Critical | Implementation Tip |
|---|---|---|
| Use Environment Variables | Prevents hard-coding API keys in your source code, protecting them from exposure if your codebase is compromised. | Store your API key on the server and have your application read it at runtime. Never commit keys to a version control system like Git. |
| Enforce HTTPS | Encrypts all data in transit between your application and the API, preventing eavesdropping on sensitive candidate information. | Configure your HTTP client to reject any non-HTTPS connections to the API endpoint. This should be a default setting. |
| Respect Rate Limits | Prevents your application from being blocked for sending too many requests, ensuring service stability and availability. | Check the API documentation for specific limits. Implement exponential backoff logic to handle 429 error responses gracefully. |
| Implement Key Rotation | Limits the window of opportunity for misuse if a key is ever accidentally exposed. It’s a proactive security measure. | Set a recurring calendar reminder (e.g., every 90 days) to generate a new key, update your environment variable, and decommission the old one. |
Following these practices isn’t just about ticking boxes; it’s about building a reliable and trustworthy system from the ground up.
Essential Security Protocols You Must Follow
Beyond key management, a few other security habits are non-negotiable for a professional-grade integration.
Always Use HTTPS
All your communication with the SpringVerify API must happen over HTTPS, not HTTP. HTTPS encrypts the data packet sent between your application and our server. This encryption shield prevents anyone from intercepting and reading sensitive details like candidate names, emails, or government IDs while in transit.
Understand Rate Limiting
APIs use rate limits to prevent abuse and ensure the service remains stable for everyone. This means there’s a cap on how many requests you can make in a set period. It’s crucial to check the SpringVerify documentation for your specific rate limits and design your integration to respect them. Pushing past these limits will get you 429 Too Many Requests errors.
Monitor and Rotate Keys
Finally, make it a standard policy to periodically rotate your API keys. This involves generating a new key in your dashboard and updating your environment variables accordingly. This simple practice drastically limits the potential damage if a key is ever accidentally exposed.
Building Resilient Integrations with Error Handling

A successful API call is a great start, but what truly separates a hobby project from a professional-grade integration is how it behaves when things go wrong. Simply hoping for a 200 OK response isn’t a strategy; it’s a recipe for silent failures that can completely derail your HR workflow.
Building a resilient integration means you have to anticipate and manage errors gracefully. It’s about ensuring your system remains stable and predictable, no matter what the API throws back at you. When you first learn how to integrate an API, you quickly find that a huge chunk of the work is just interpreting the full spectrum of HTTP status codes. These codes are the API’s language for communicating its status. Understanding them in the context of SpringVerify is what allows you to build a system that can fix itself—or at least know when to ask for help.
Decoding Common API Error Codes
Beyond a successful response, you’re going to encounter a range of codes that signal different problems. Your code needs to be smart enough to tell the difference between a temporary server hiccup and a permanent data issue.
Here are the most common error codes you absolutely need to handle:
400 Bad Request: This almost always means there’s something wrong with the data you sent. Maybe it’s a malformed JSON payload, a missing required field like the candidate’s email, or an invalid data format. The API response body will usually give you a specific message that pinpoints the exact problem.401 Unauthorized: This is a straightforward authentication failure. Your request was flat-out rejected because the API key you provided was either missing, incorrect, or had expired. This is an immediate red flag that requires attention.403 Forbidden: Don’t confuse this with a401. A403error means you are authenticated, but you just don’t have permission to perform that specific action. For instance, your API key might be perfectly valid but lacks the permissions to kick off a particular type of background check.500 Internal Server Error: This one’s on us, not you. It means there’s a problem on the SpringVerify side. While it’s not your fault, your application still needs to know how to react to these temporary server issues.
Implementing Smart Error Handling in Your Code
The most reliable way to manage these potential issues is by wrapping your API calls in try-catch blocks (or whatever the equivalent is in your language of choice). This structure lets you attempt the request and then “catch” any errors that pop up, giving you a chance to handle them logically instead of letting your entire application crash and burn.
Let’s say you make a request and get a 401 Unauthorized error back. A naive integration might just fail silently, leaving you to wonder why no new background checks are being created. A resilient integration, on the other hand, would immediately spring into action.
Your error handling logic should be proactive. When you catch a critical error like an invalid API key, your system should automatically send a notification—via email, Slack, or your monitoring tool—to an administrator. This prevents downtime and ensures the problem is fixed immediately.
This simple, proactive step turns a potential crisis into a manageable support ticket.
Creating Logic for Retries and Alerts
Not all errors are created equal, and your code’s response should depend entirely on the status code it receives. A 400 Bad Request, for example, points to a data problem on your end. Retrying the exact same request will only produce the same error. The correct move here is to log the detailed error message from the API and alert a developer to investigate the malformed data.
In contrast, a 500 Internal Server Error signals a temporary glitch with the API server itself. This is the perfect scenario for an automated retry mechanism. A smart strategy is to implement exponential backoff, where your application waits a moment before retrying, then doubles the waiting time after each subsequent failure. This simple tactic prevents your system from hammering our server while it’s trying to recover.
Here’s a practical breakdown of how you could structure this logic:
- Wrap the API call in a try-catch block.
- Check the response status code on every call.
- If
200or201: Success! You can proceed with your workflow. - If
400,401, or403: These are client-side errors. Log the detailed error, do not retry, and send an immediate alert to an admin or developer. - If
500or503: These are server-side issues. Wait a few seconds and retry the request. If it fails again, increase the wait time and try once more before finally giving up and sending an alert.
This kind of intelligent error handling is what separates a fragile, high-maintenance integration from a truly resilient one you can trust to run your critical HR processes without constant supervision.
From Sandbox to Live: Testing, Deploying, and Monitoring Your Integration
This is where the rubber meets the road. You’ve built the integration, and now it’s time to move from the safety of your development environment to the real world, where your code will handle live candidate data. This transition from testing to deployment is where all your careful preparation truly pays off. It’s a critical phase that demands thorough testing to make sure your integration is not just working, but is also stable and secure before it goes live.
The first, and frankly most important, step is to put your integration through its paces using the SpringVerify sandbox. This is a risk-free environment that perfectly mirrors our live production API, letting you simulate every imaginable scenario without touching real data or spending a rupee. Think of it as your personal validation lab.
Putting Your Code Through Its Paces in the Sandbox
Before you even consider going live, you need to try and break your integration. I’m serious. This isn’t just about checking the “happy path” where a candidate is created flawlessly. You need to be actively looking for weaknesses to see how your system holds up under pressure.
Your testing plan should cover all the angles:
- Success Scenarios: Does a standard API call create a candidate and kick off the right checks? Does it return a
201 Createdstatus code like it’s supposed to? - Failure Simulation: What happens when you deliberately send incomplete or dodgy data? Your system should gracefully handle the
400 Bad Requestfrom the API and, just as importantly, log the error correctly so you know what happened. - Edge Case Validation: Test for the weird stuff. What if you submit a duplicate candidate? Does your system handle the API’s response without crashing?
As you get closer to deployment, it’s a good idea to run through a comprehensive software testing checklist. This kind of disciplined approach helps ensure you haven’t missed anything obvious.
Making the Switch to Production
Once your integration has passed every test you can throw at it in the sandbox, you’re ready to flip the switch to the live production environment. The actual process is simple, but you need to handle it with care to avoid any hiccups.
At its core, you’re just swapping out your sandbox credentials for your production ones. This means updating two key pieces of information in your application’s configuration—which, hopefully, you’re storing securely as environment variables:
- The API Endpoint URL: You’ll change this from the sandbox URL to the live production URL.
- The API Key: Replace the sandbox API key with your new production key.
A bit of pro advice: Always use separate configuration files or environment variable sets for development, testing, and production. This setup makes switching between environments a breeze and drastically cuts down the risk of using the wrong credentials in the wrong place. We’ve all been there, and it’s not a fun situation.
Keeping an Eye on Things Post-Deployment
Your work isn’t done just because the integration is live. Continuous monitoring is absolutely essential for the long-term health and reliability of your automated workflow. You need to keep a close watch on how the integration is performing to catch issues before they affect your hiring process.
Set up some basic monitoring and alerting to track key metrics. For example, you could configure an alert to ping your team if you see a sudden spike in 401 Unauthorized or 500 Internal Server Error responses. This kind of proactive monitoring ensures your integration remains a reliable part of your HR toolkit.
This need for robust integration and monitoring is growing fast. Sectors like BFSI and healthcare are heavily dependent on these connections. In fact, India’s Global Capability Centres are projected to push IT infrastructure investment to an estimated $105 billion by 2030, which will only increase the demand for skilled API work. For larger organisations, strong monitoring is a non-negotiable part of managing these complex systems—something our enterprise solutions are specifically designed to handle.
Frequently Asked Questions About HR API Integration
Jumping into an API integration, especially for something as critical as your HR workflows, naturally brings up a few questions. We get it. Over the years, we’ve helped countless teams navigate this process, and a few common queries pop up time and again. Let’s walk through them.
One of the first things people ask about is data security. It’s a valid concern. You can rest assured that all data sent to and from the SpringVerify API is encrypted using HTTPS. This keeps sensitive candidate information locked down tight during transit. On top of that, your unique API key authenticates every single request, adding a crucial layer of security.
Another frequent question revolves around customising checks for different roles. Not every hire needs the same level of scrutiny. The API is built for this flexibility. You can specify exactly which checks you need—from ID verification to employment history—just by including them in the payload of your initial API call.
What Happens if an API Call Fails?
This is a big one for developers: what’s the game plan when a request doesn’t go through? If you ever see a 403 Forbidden error, it tells you your API key is correct, but it lacks the permissions for that specific action. This is different from a 401 Unauthorized error, which means the key itself is invalid.
What about server-side problems, like a 500 error? The best approach here is to build a retry mechanism with exponential backoff. This clever tactic stops your system from hammering our server while it’s recovering, giving it space to get back online.
From our experience, it’s a smart move to set up automated alerts for recurring
4xxor5xxerrors. This way, your tech team gets a heads-up immediately to dig into the root cause, preventing silent failures from quietly disrupting your hiring process.
Finally, we often get asked about usage limits. Yes, we do have rate limits in place. These are essential for maintaining service stability for everyone. You can find the specific numbers in our documentation, and it’s important to design your integration to respect these thresholds to avoid any temporary service hiccups.
Ready to build a faster, more reliable hiring workflow? Discover how SpringVerify can automate your background checks and integrate seamlessly with your existing HR systems. Visit us at https://in.springverify.com to get started.


